大数据技术原理与应用华为云实验实时检索
1.实验介绍
1.1.实验概述
本实验基于华为云服务。通过模拟开发流程,包括数据导入库,组件应用开发,构建搜索服务,最终完成实时检索功能。
1.2.实验目的
l 掌握大数据相关服务的购买及基础配置
l 掌握HBase应用开发的基本语法
l 掌握ElasticSearch应用开发的基本语法
l 掌握实时检索的功能实现
1.3.实验规划
在同一VPC内的ECS通过内网访问MRS HBase和CSS各自的网络地址,并通过各自网络地址完成数据导入和数据查询。

1.4.实验思路
(1)通过配置和申请华为云服务VPC,ECS,MRS和CSS作为基础配置。
(2)ECS在同一VPC内通过安全组规则访问MRS和CSS服务。
(3)在ECS上搭建基本应用开发环境。
(4)在ECS上建工程项目,开发基于MRS和CSS的应用程序。
(5)服务使用完毕,进行释放资源。
1.5.实验流程

2.实验平台与服务
l ECS (Elastic Cloud Server)
弹性云服务器是由CPU、内存、操作系统、云硬盘组成的基础的计算组件。弹性云服务器创建成功后,就可以像使用自己的本地PC或物理服务器一样,在云上使用弹性云服务器。
l MRS (MapReduce Service)
MapReduce服务是一个在华为云上部署和管理Hadoop系统的服务,一键即可部署Hadoop集群。
l VPC(Virtual Private Cloud)
虚拟私有云是为云服务器、云容器、云数据库等云上资源构建隔离、私密的虚拟网络环境。VPC丰富的功能可以灵活管理云上网络,包括创建子网、设置安全组和网络ACL、管理路由表、申请弹性公网IP和带宽等。此外,还可以通过云专线、VPN等服务将VPC与传统的数据中心互联互通,灵活整合资源,构建混合云网络。
VPC使用网络虚拟化技术,通过链路冗余,分布式网关集群,多AZ部署等多种技术,保障网络的安全、稳定、高可用。
l CSS (Cloud Search Service)
云搜索服务提供托管的分布式搜索引擎服务,完全兼容开源Elasticsearch搜索引擎,支持结构化、非结构化文本的多条件检索、统计、报表。云搜索服务的使用流程和数据库类似。
3.实验步骤与结果
3.1. 大数据相关服务的购买与基本配置
3.1.1. 开通VPC服务
步骤如下:
创建私有云

配置私有云后购买

创建成功

购买和配置弹性公网IP

购买配置如下:
计费模式 - 按需计费
区域 - 华北-北京四
带宽类型 - 独享
购买量 - 2
其余配置默认,详细配置如下:


配置好后点击立即购买

确认配置后提交

可以看到配置成功

3.1.2. 开通MRS服务
购买MapReduce服务 - MRS搜索MapReduce服务搜索MapReduce服务或MRS
购买MapReduce服务
进入MapReduce服务控制台后,选择右边的购买集群

MapReduce服务配置
进入购买页面后,选择自定义购买
按照如下信息配置集群基本信息:
区域—选择“华北-北京四”。
集群名称—自定义名称,本人是“mrs-HSU”。
集群版本—MRS 1.9.2
集群类型—选择分析集群。
组件选择—勾选所有组件。


 点击下一步
点击下一步

 告警—选择关闭,其他都是默认配置。

 点击立即购买,返回控制台集群列表页面,显示集群正在启动(需要10分钟左右)。
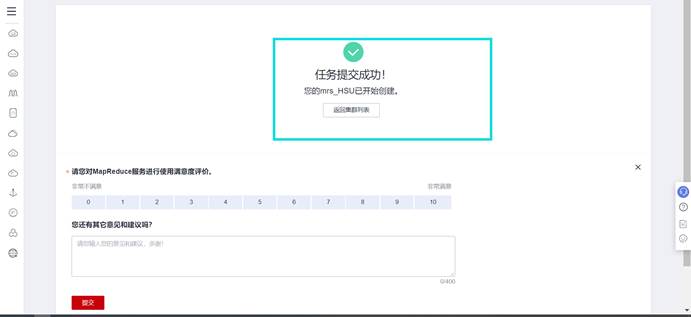
 集群启动成功后,点击集群名称进入集群信息页面
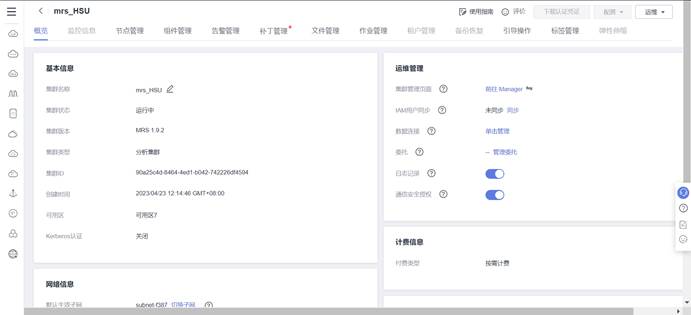
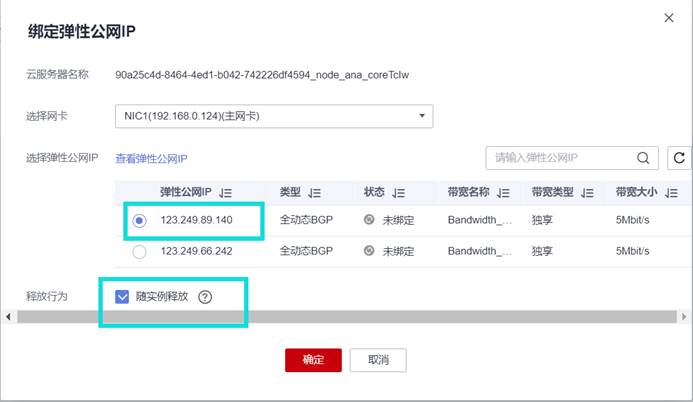
绑定弹性公网IP
在集群信息页面点击节点管理,选择Core节点,点击进入

进入弹性云服务器页面后,选择弹性公网IP,点击绑定弹性公网IP

选择一个弹性公网IP绑定,点击确定(请记住这两个IP用于后续登录)。
修改安全组
配置好IP后需要修改网络安全组,否则无法登陆到Master服务器。点击“安全组”,选择“更改安全组”。
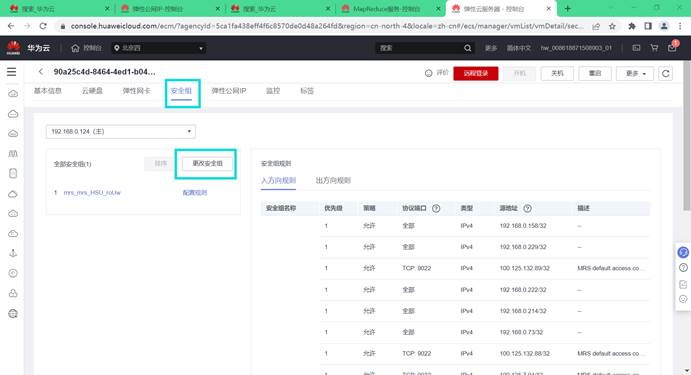
选择入方向规则,点击“添加规则”,选择“全部放通”,点击确定。
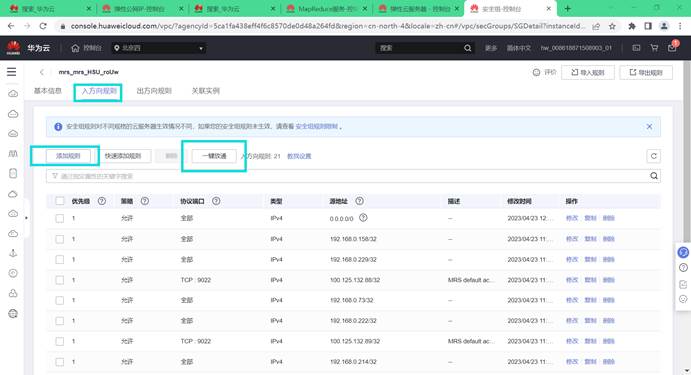
确定集群节点hostname和ip
在集群节点管理页面查看集群节点hostname和ip


记住此hostname和ip,并将ip地址前移,下划线”_”改为短线”-”,后面ECS修改hosts文件会用到。如下
192.168.0.71 node-master2xhIH
192.168.0.193 node-master1iqma
192.168.0.124 node-ana-coreTcIw
192.168.0.173 node-ana-coreDqFa
192.168.0.30 node-ana-coreyBOq
注意:也可以通过远程登录MRS集群任意节点通过命令查看/etc/hosts文件拿到hostname和ip。登录MRS集群节点后,执行命令如下:
cat /etc/hosts
3.1.3. 开通云搜索CSS服务
搜索云搜索服务
在页面搜索云搜索服务或CSS,回车进入

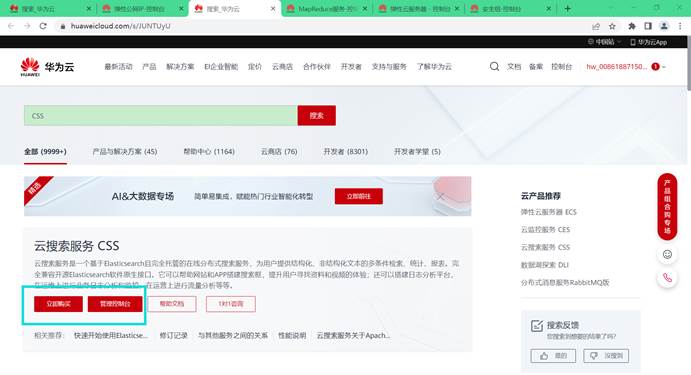
购买云搜索服务
进入云搜索服务控制台后,选择创建集群。


云搜索服务配置
进入购买页面后,配置集群参数
计费模式 - 按需计费
区域 - 华北-北京四
集群版本 – 7.6.2
集群名称 – Es-search。
节点数量 – 1
CPU****架构 – x86计算
节点规格 - 内存优化型 - 2u16g(若无此配置可选择更高配置)
节点存储 – 高I/O
节点存储容量 – 40GB
按需套餐包 – 默认不勾选
虚拟私有云 - 选择之前设置的虚拟私有云
子网 - 选择一个子网
安全组 - Sys-default(与需要购买的ECS,MRS保持一致)
安全模式 - 关闭
其余配置默认
详细配置见下图:


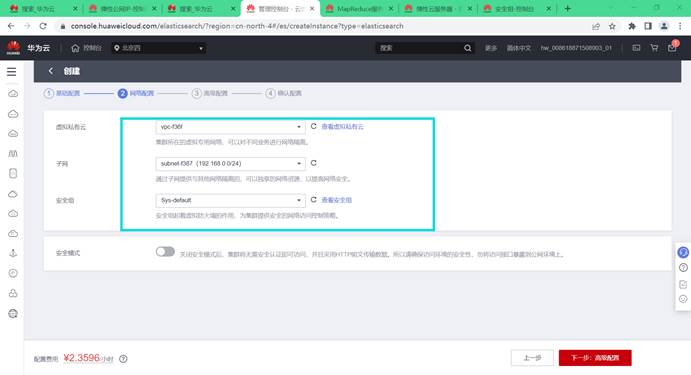

配置完成之后,右边选择立即申请,进入页面确认配置提交申请。


进入集群管理页面,等待集群启动
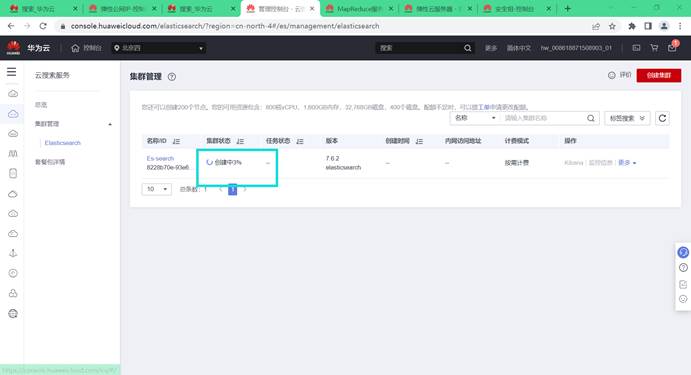
集群启动成功后,查看集群名和内网访问地址,后续conf.properties配置文件会用到:

3.1.4. 购买弹性云服务器ECS
搜索弹性云服务器
在页面搜索弹性云服务器或ECS回车进入

购买弹性云服务器
进入控制台后,选择购买弹性云服务器
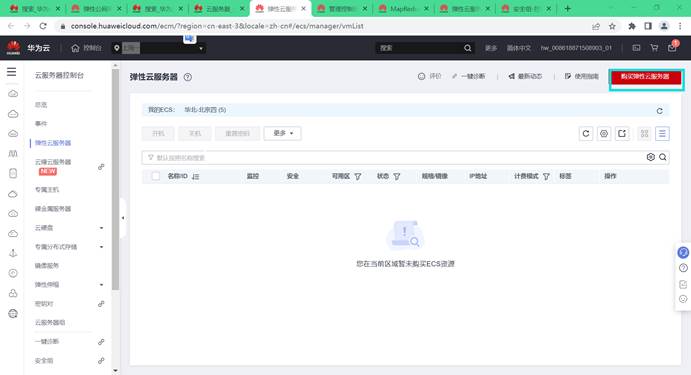
弹性云服务器配置
计费模式 - 按需计费,
区域 - 华北-北京四
可用区 – 随机分配
规格 - 四核8G
镜像 - 公共镜像Windows Server 2016 标准版 64位简体中文(40GB)
主机安全 – 不勾选主机安全
系统盘 – 普通IO,40GB


点击下一步:网络配置
虚拟私有云 - 选择之前设置的虚拟私有云
网卡 – 默认选择一个子网,自动分配IP地址
安全组 - Sys-default(注意:此安全组和之后购买的MRS,CSS保持一致)
弹性公网IP - 现在购买
规格 - 全动态BGP,带宽大小 – 5


点击下一步:高级配置
云服务器名称 – 自定义名称,本例以ecs-search为例
登录方式 - 密码
密码 - 自行设置(用于登录,请妥善保管!!!)
云备份 、云服务器 、高级选项 – 默认配置
购买量 - 1
配置完成之后,右边选择下一步,进入页面确认配置后立即提交。


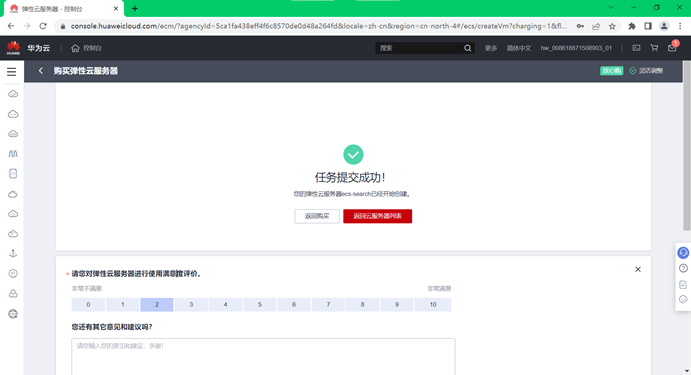
确认配置后,点击立即购买。

完成后,控制台显示正在启动(启动后可看到弹性公网IP)。

3.1.5. 访问Windows云服务器
连接弹性云服务器
在个人电脑打开运行 (快捷键Win + R)输入mstsc,打开远程桌面连接

输入任务四中购买的弹性云服务器ecs-search的弹性公网IP,在弹性云服务器页面可看到该IP地址

输入用户名Administrator和密码(ECS服务器设置的密码)

安装chrome浏览器
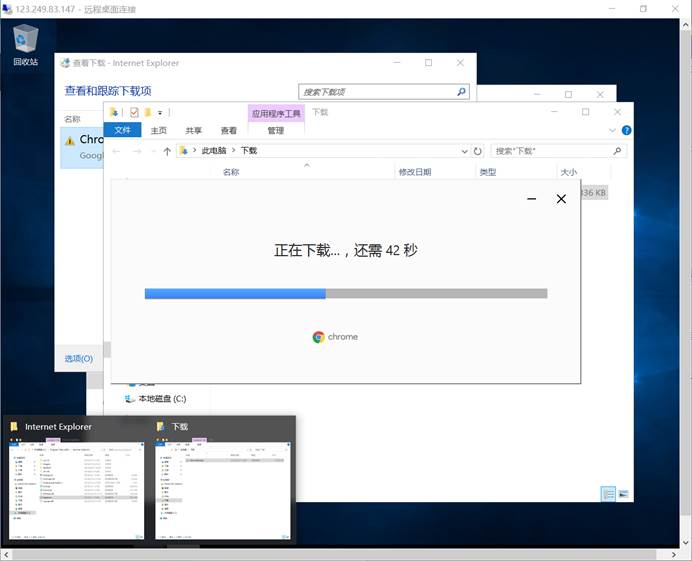
在ECS远程桌面打开IE浏览器,输入谷歌官网https://www.google.cn/chrome/下载chrome浏览器

选择下载

下载完后直接运行文件,自动安装。完成

安装Maven
下载Maven
连接ECS到远程桌面后,在远程桌面打开谷歌浏览器输入下面网址下载Maven安装包
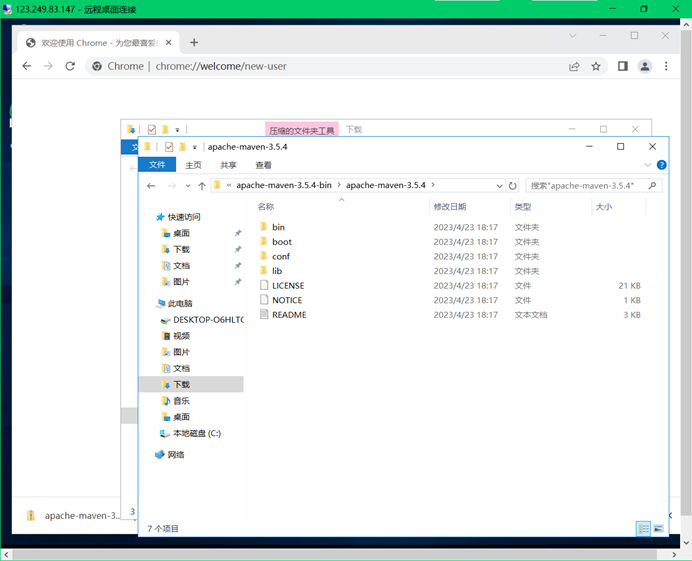
下载链接:http://archive.apache.org/dist/maven/maven-3/3.5.4/binaries/apache-maven-3.5.4-bin.zip
(注:若版本失效进入http://archive.apache.org/dist/maven/maven-3/寻找合适的版本)

下载好进入文件所在路径,解压安装到默认地址:
配置maven的setting文件
进入华为开源镜像网站https://mirrors.huaweicloud.com/ ,下载setting文件
搜索华为huaweiCloud SDK,点击空白处下载。

登录后下载setting文件

将下载好的setting文件放入maven的conf 路径下,直接覆盖原有的setting文件即可

安装JDK
在ECS远程桌面进入Oracle官网https://www.oracle.com/technetwork/java/javase/downloads/jdk8-downloads-2133151.html
下载JDK8 版本8u261,需要接受协议,单击下载后登录Orcale账户才能正常下载。

下载好后运行安装JDK
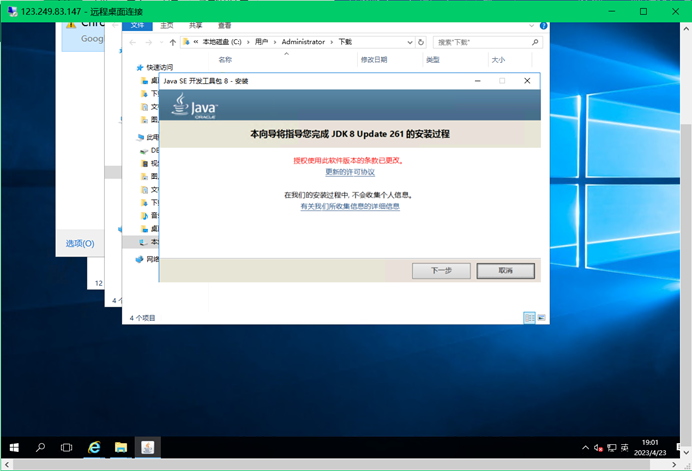
安装路径默认


安装JRE java运行环境
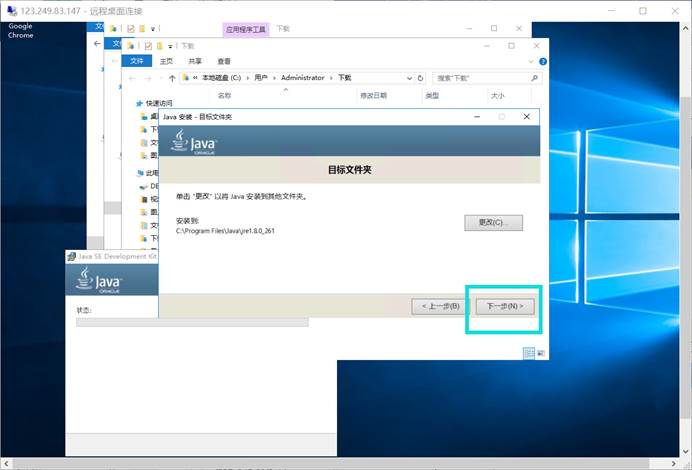

安装路径默认,完成后点击关闭。

JDK安装完成。
配置JDK环境变量
在ECS远程桌面打开系统设置,在文件资源管理器右键此电脑,选择属性
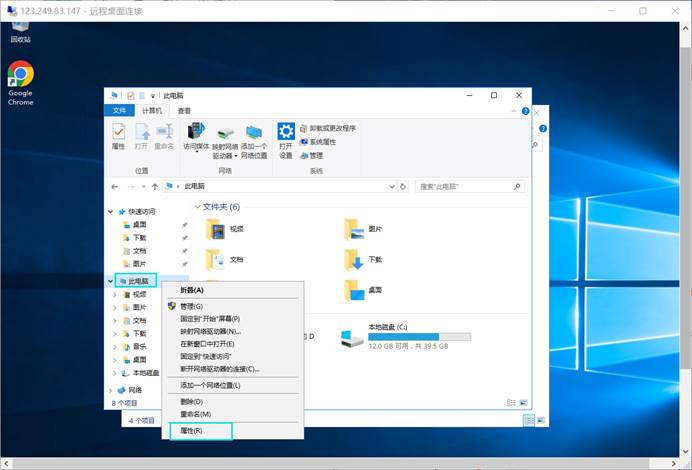
选择高级系统设置,选择环境变量

编辑系统变量Path

新建三个系统变量
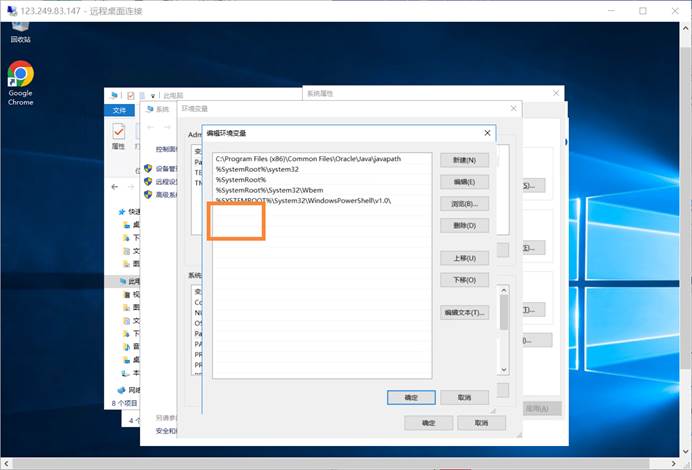
通过浏览更改路径
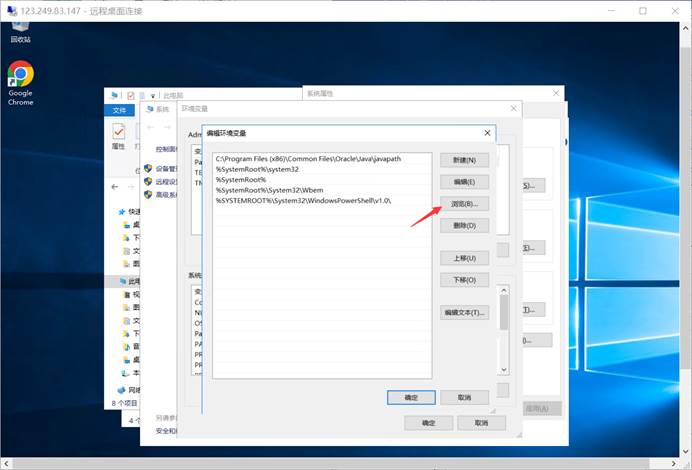
选择刚才安装的Maven路径下的bin文件夹路径

确定后,同理,修改变量2的路径,选择浏览
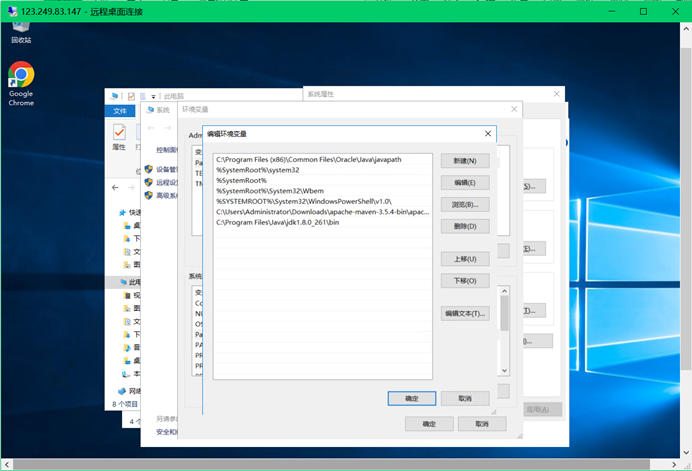
选择安装的JDK路径下的bin路径

确定后,继续选择变量3,选择浏览

选择JRE的安装路径下的bin路径

确定后,将新增的环境变量移动至最上方。

点击确认,保存更改。
验证是否正确配置
在远程桌面打开运行(快捷键Win + R) 输入cmd
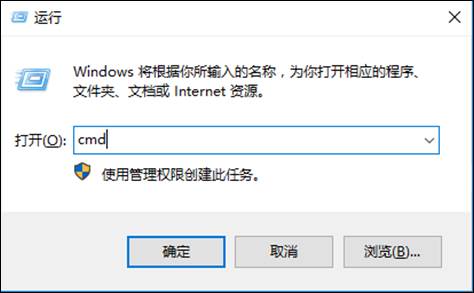
输入
mvn -version
若配置正确会有Maven版本信息输出

输入:
java -version
若配置正确会有java版本信息输出

输入:
javac -version

若配置正确会有java 编译器版本信息输出
安装Eclipse
下载Eclipse
在ECS远程桌面进入Eclipse官网https://www.eclipse.org/downloads/packages/release/oxygen/3a 下载oxygen版本
选择64位

点击下载

安装Eclipse
下载完成之后,解压安装包,解压路径随意,打开解压好的eclipse文件夹,选中 eclipse.exe文件,在桌面创建快捷方式,Eclipse的安装就完成了。


选择工作空间即代码存储位置。

配置Maven
在Eclipse页面选择Window -> Preferences -> Maven -> Installations - > add
添加之前安装的Maven

添加自己的Maven安装路径,点击Finish。

选择应用自行安装的Maven
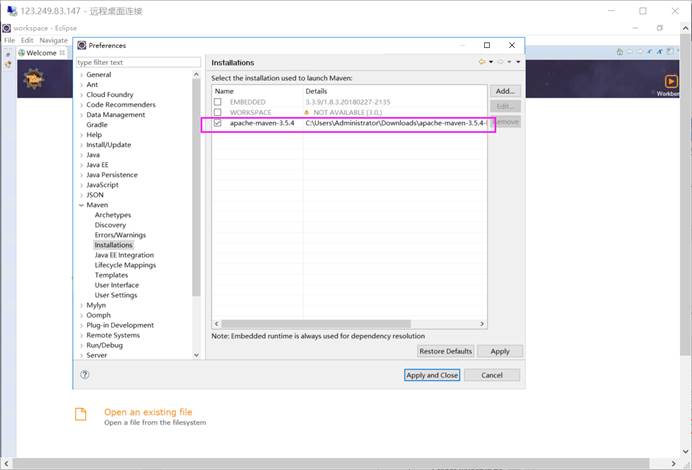
在Preferences 下的Maven下选择User Setting
选择自行下载的setting文件

完成后点击应用并关闭
修改hosts文件
在ECS远程桌面进入目录C:\Windows\System32\drivers\etc,修改hosts文件
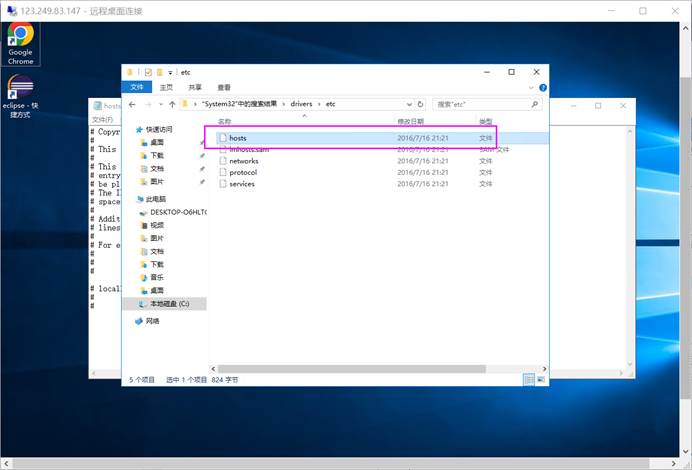
右键打开方式,选择记事本,在末尾编辑添加集群节点hostname和ip(任务二中MRS的主机名和IP地址),结果如下。(替换为自己集群节点的hostname和ip):
192.168.0.124 node-ana-coreTcIw

保存,环境配置到此结束。
3.2. 大数据实时数据分析开发实战
3.2.1. 步骤1 新建项目
在ECS远程桌面进打开Eclipse,新建项目。
点击File -> New -> Maven Project(如果没有Maven Project,则选择project,然后在Maven中找到Maven Project)

点击next,勾选Create a simple project

点击Next,输入GroupId和ArtifactId,版本默认

点击Finish,等待项目初始化完成。
3.2.2. 步骤2 修改依赖文件
项目初始化完成后,修改pom文件,该文件用来管理项目依赖包。
pom文件初始如下:

在 和 之间添加如下配置(可从提供的POM文件粘贴所需内容)
<hbase.version>2.1.1.0101-mrs-2.0</hbase.version>
<zookeeper.version>3.5.1-mrs-2.0</zookeeper.version>
<hadoop.version>3.1.1-mrs-2.0</hadoop.version>
<project.build.sourceEncoding>UTF-8</project.build.sourceEncoding>
<project.build.sourceEncoding>UTF-8</project.build.sourceEncoding>
<maven.compiler.source>1.8</maven.compiler.source>
<maven.compiler.target>1.8</maven.compiler.target>
更改完成之后使pom文件(ctrl+s保存)生效,此时确保连通网络,等待项目下载相关资源。
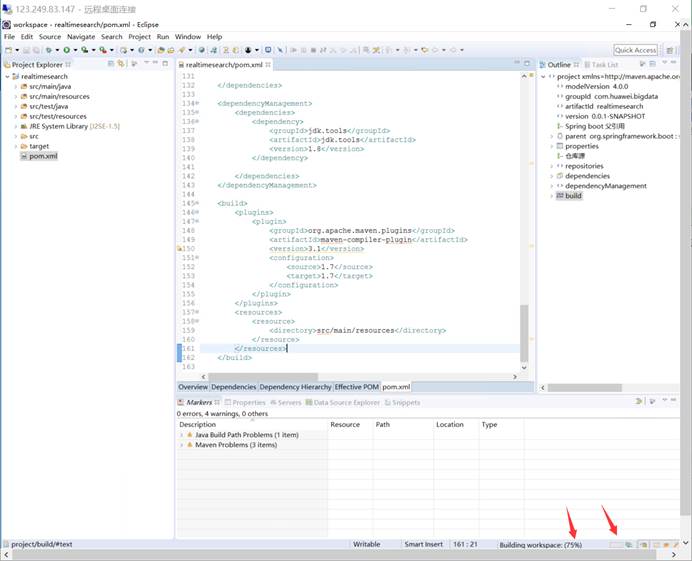
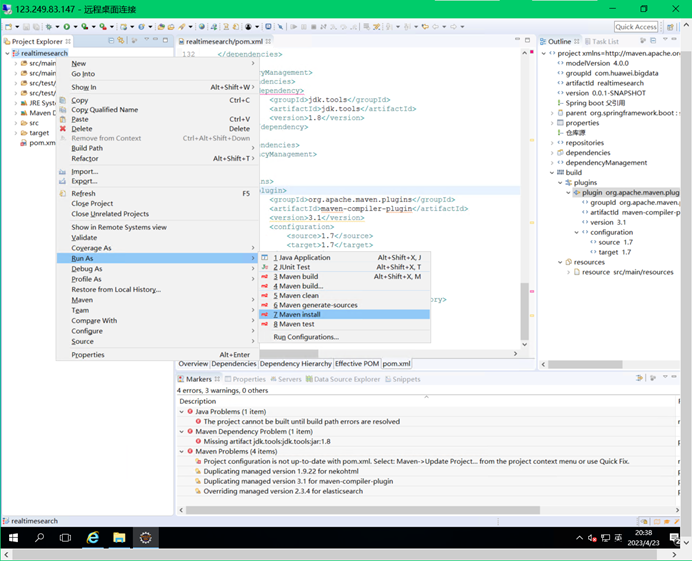
下载完成后,右键项目名选择Run As,选择Maven install
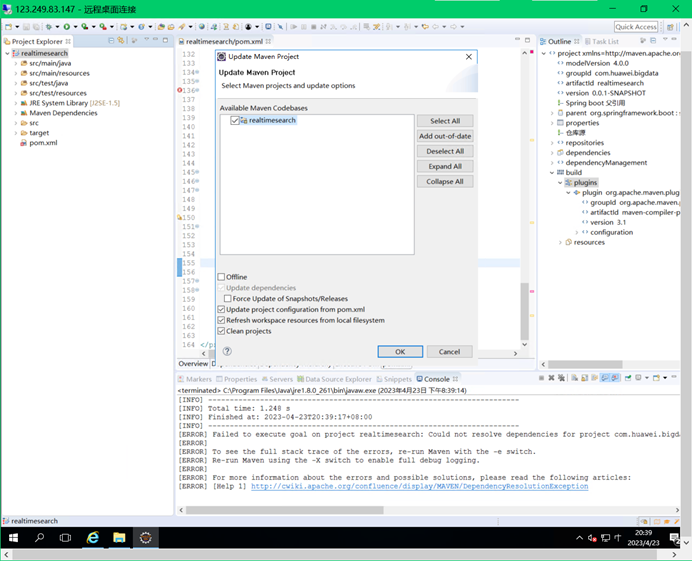
右键项目名选择Maven,选择Update Project
修改项目的Java Build Path
项目右键,选择Build Path > Configure Build Path > Java Build Path >Libraries ,选中JRE System Library[J2SE-1.5],点击右侧的Remove,

再点击Add Library… > JRE System Library > Next (默认选中安装的JDK1.8) > Finish

设置完成后确保项目不再报错即可。
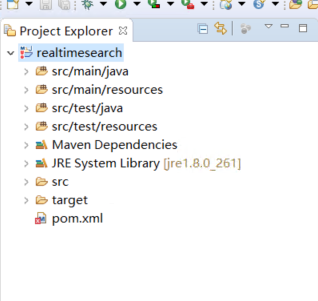
3.2.3.步骤3 编辑配置文件
新建conf.properties文件
右键src/main/resources -> New -> Other -> General -> File -> 新建conf.properties配置文件

文件建好之后,在该文件键入如下内容:
#原始数据路径
inputPath =data/
#HBase的配置
#通过MRS Manager服务管理列表获取的ZK连接地址
ZKServer=192.168.0.77:2181
#HBase表名
tableName=PublicSecurity
#HBase列族
columnFamily1=Basic
columnFamily2=OtherInfo
#ElasticSearch的配置
#通过CSS服务列表获取的ES集群名称,内外IP,默认端口
clusterName=Es-search
hostName=192.168.0.3
tcpPort=9300
indexName=publicsecurity
typeName=info
注意:更改ZKServer的地址为购买的MRS Manager服务页面的ZKServer服务地址,ElasticSearch的clusterName和hostName也改为购买的对应CSS服务的集群名和IP地址。

新建application.properties文件
右键src/main/resources -> New -> Other -> General -> File ->新建application.properties配置文件

文件建好之后,在该文件键入如下内容:
#config
server.port=8084
server.contextPath=/hw_bigdata
#web页面热布署
spring.thymeleaf.cache=false
#解决html5检查太严格问题
spring.thymeleaf.mode = LEGACYHTML5
新建log4j.properties文件
右键src/main/resources -> New -> Other -> General -> File -> 新建log4j.properties配置文件

文件建好之后,在该文件键入如下内容:
log4j.rootLogger=INFO,console
log4j.appender.console=org.apache.log4j.ConsoleAppender
log4j.appender.console.target=System.out
log4j.appender.console.layout=org.apache.log4j.PatternLayout
log4j.appender.console.layout.ConversionPattern=%-4r [%t] %-5p %c %x - %m%n
新建log4j2.properties文件
右键src/main/resources -> New -> Other -> General -> File -> 新建log4j2.properties配置文件
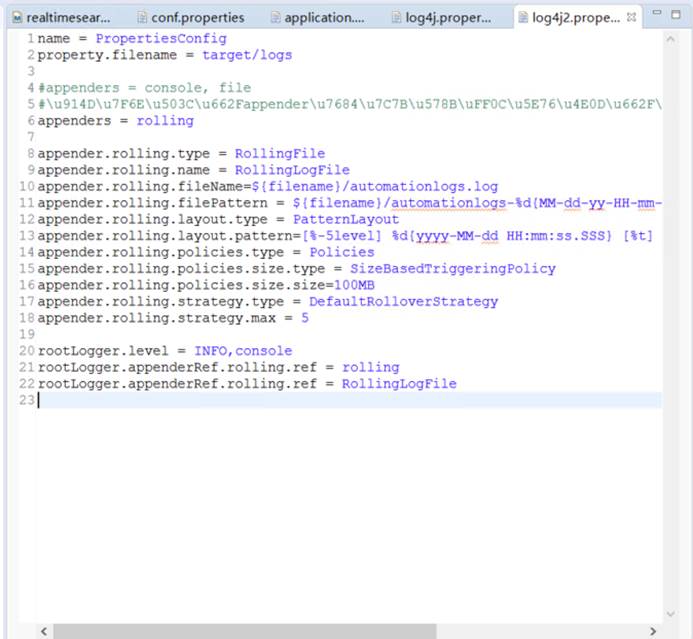
文件建好之后,在该文件键入如下内容:
name = PropertiesConfig
property.filename = target/logs
#appenders = console, file
#配置值是appender的类型,并不是具体appender实例的name
appenders = rolling
appender.rolling.type = RollingFile
appender.rolling.name = RollingLogFile
appender.rolling.fileName=${filename}/automationlogs.log
appender.rolling.filePattern = ${filename}/automationlogs-%d{MM-dd-yy-HH-mm-ss}-%i.log
appender.rolling.layout.type = PatternLayout
appender.rolling.layout.pattern=[%-5level] %d{yyyy-MM-dd HH:mm:ss.SSS} [%t] %c{1} - %msg%n
appender.rolling.policies.type = Policies
appender.rolling.policies.size.type = SizeBasedTriggeringPolicy
appender.rolling.policies.size.size=100MB
appender.rolling.strategy.type = DefaultRolloverStrategy
appender.rolling.strategy.max = 5
rootLogger.level = INFO,console
rootLogger.appenderRef.rolling.ref = rolling
rootLogger.appenderRef.rolling.ref = RollingLogFile
3.2.4.步骤4 导入数据
新建文件夹
在项目下新建数据存放文件夹
右键项目名 -> New -> Folder -> 新建data文件夹(可根据路径在conf.properties文件修改)
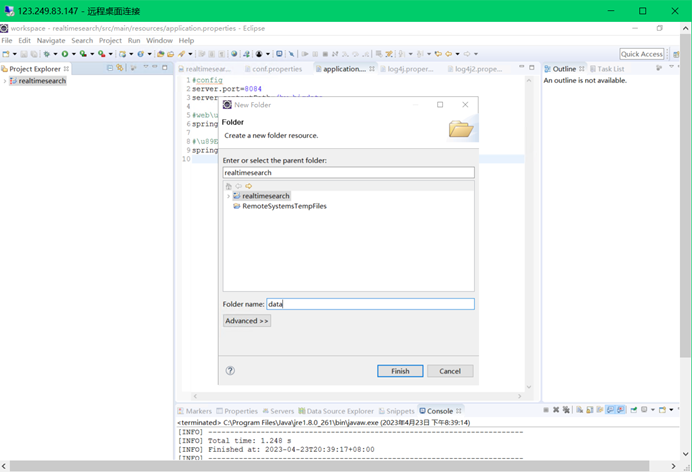
导入数据
将测试数据文件复制到该文件夹。

3.2.5.步骤5 编写常量工具类
新建包
右键src/main/java -> New -> Package -> 新建com.huawei.bigdata.utils包
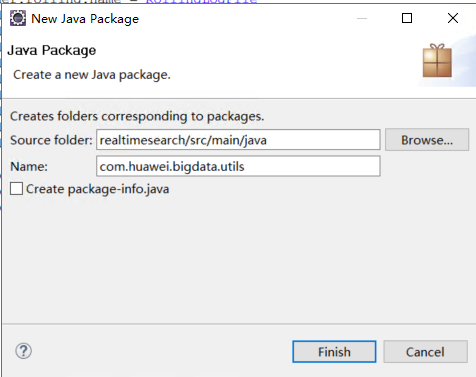
新建类
右键com.huawei.bigdata.utils -> New -> Class -> 新建ConstantUtil类

编辑类
编辑该类的内容:
package com.huawei.bigdata.utils;
import org.apache.log4j.PropertyConfigurator;
import org.slf4j.Logger;
import org.slf4j.LoggerFactory;
import java.io.FileInputStream;
import java.io.IOException;
import java.util.Properties;
/**
* Created by ThisPC on 2020/8/6.
*/
public class ConstantUtil {
public static final Properties PROPS = new Properties();
public static final Logger LOG = LoggerFactory.getLogger(ConstantUtil.class);
public static final String INPUT_PATH;
public static final String ZK_SERVER;
public static final String TABLE_NAME;
public static final String COLUMN_FAMILY_1;
public static final String COLUMN_FAMILY_2;
public static final String INDEX_NAME;
public static final String TYPE_NAME;
//ES集群名,默认值elasticsearch
public static final String CLUSTER_NAME;
//ES集群中某个节点
public static final String HOSTNAME;
//ES连接端口号
public static final int TCP_PORT;
static {
try {
//加载日志配置
PropertyConfigurator.configure(ConstantUtil.class.getClassLoader().getResource(“log4j.properties”).getPath());
//加载连接配置
PROPS.load(new FileInputStream(ConstantUtil.class.getClassLoader().getResource(“conf.properties”).getPath()));
} catch (IOException e) {
e.printStackTrace();
}
INPUT_PATH = PROPS.getProperty(“inputPath”);
ZK_SERVER = PROPS.getProperty(“ZKServer”);
TABLE_NAME = PROPS.getProperty(“tableName”);
INDEX_NAME = PROPS.getProperty(“indexName”).toLowerCase();
TYPE_NAME = PROPS.getProperty(“typeName”);
COLUMN_FAMILY_1 = PROPS.getProperty(“columnFamily1”);
COLUMN_FAMILY_2 = PROPS.getProperty(“columnFamily2”);
CLUSTER_NAME = PROPS.getProperty(“clusterName”);
HOSTNAME = PROPS.getProperty(“hostName”);
TCP_PORT = Integer.valueOf(PROPS.getProperty(“tcpPort”));
}
}
3.2.6.步骤6 编写Hbase工具类
新建类
右键com.huawei.bigdata.utils -> New -> Class -> 新建HBaseUtil类

编辑类
编辑该类的内容
package com.huawei.bigdata.utils;
import org.apache.hadoop.conf.Configuration;
import org.apache.hadoop.hbase.*;
import org.apache.hadoop.hbase.client.*;
import org.apache.hadoop.hbase.util.Bytes;
import org.slf4j.Logger;
import java.io.IOException;
import java.util.ArrayList;
import java.util.HashMap;
import java.util.List;
import java.util.Map;
/**
* Created by ThisPC on 2020/8/6.
*/
public class HBaseUtil {
/**
* HBase连接的基本配置
*/
public static Admin admin = null;
public static Configuration conf = null;
public static Connection conn = null;
private HashMap<String, Table> tables = null;
private static final Logger LOG = ConstantUtil.LOG;
/**
* 构造函数加载配置
*/
public HBaseUtil() {
this(ConstantUtil.ZK_SERVER);
}
public HBaseUtil(String zkServer) {
init(zkServer);
}
private void ifNotConnTableJustConn(String tableName) {
if (!tables.containsKey(tableName)) {
this.addTable(tableName);
}
}
public Table getTable(String tableName) {
ifNotConnTableJustConn(tableName);
return tables.get(tableName);
}
public void addTable(String tableName) {
try {
tables.put(tableName, conn.getTable(TableName.valueOf(tableName)));
} catch (IOException e) {
e.printStackTrace();
}
}
/**
* 通过 LIst
* @param putList
* @return
*/
public boolean put(String tableName, List
boolean res = false;
ifNotConnTableJustConn(tableName);
try {
getTable(tableName).put(putList);
res = true;
} catch (IOException e) {
e.printStackTrace();
}
return res;
}
/**
* 读取一行记录,一个rowKey的所有记录
* @param tableName
* @param row
* @return
* @throws IOException
*/
public Result get(String tableName, String row) throws IOException {
Result result = null;
ifNotConnTableJustConn(tableName);
Table newTable = getTable(tableName);
Get get = new Get(Bytes.toBytes(row));
try {
result = newTable.get(get);
} catch (IOException e) {
e.printStackTrace();
}
return result;
}
/**
* 创建表
* @param tableName
* @param columnFamilys
*/
public boolean createTable(String tableName, String… columnFamilys) {
boolean result = false;
try {
if (admin.tableExists(TableName.valueOf(tableName))) {
LOG.info(tableName + “表已经存在!”);
} else {
HTableDescriptor tableDesc = new HTableDescriptor(TableName.valueOf(tableName));
for (String columnFamily : columnFamilys) {
tableDesc.addFamily(new HColumnDescriptor(columnFamily.getBytes()));
}
admin.createTable(tableDesc);
result = true;
LOG.info(tableName + “表创建成功!”);
}
} catch (IOException e) {
e.printStackTrace();
LOG.info(tableName + “表创建失败 !”);
}
return result;
}
/**
* 判断表是否存在
* @param tableName
* @return
*/
public boolean tableExists(String tableName) throws IOException {
return admin.tableExists(TableName.valueOf(tableName));
}
/**
* 停用表
* @param tableName
*/
public void disableTable(String tableName) throws IOException {
if (tableExists(tableName)) {
admin.disableTable(TableName.valueOf(tableName));
}
}
/**
* 删除表
* @param tableName
*/
public void deleteTable(String tableName) throws IOException {
disableTable(tableName);
admin.deleteTable(TableName.valueOf(tableName));
}
/**
* 查询所有表名
* @return
* @throws Exception
*/
public List
ArrayList
if (admin != null) {
HTableDescriptor[] listTables = admin.listTables();
if (listTables.length > 0) {
for (HTableDescriptor tableDesc : listTables) {
tableNames.add(tableDesc.getNameAsString());
}
}
}
return tableNames;
}
/**
* 删除所有表,慎用!仅用于测试环境
*/
public void deleteAllTable() throws Exception {
List
for (String s : allTbName) {
LOG.info(“Start delete table : “ + s + “……”);
deleteTable(s);
LOG.info(“done delete table : “ + s);
}
}
/**
* 初始化配置
* @param zkServer
*/
public void init(String zkServer) {
tables = new HashMap<String, Table>();
conf = HBaseConfiguration.create();
//通过CSS cloudTable服务列表获取的ZK连接地址
//cloudtable-f7c2-zk1-nMuTH9Xv.cloudtable.com:2181,cloudtable-f7c2-zk2-5z92kpre.cloudtable.com:2181,cloudtable-f7c2-zk3-xVNq61Sb.cloudtable.com:2181
//192.168.0.121:2181 运行后可看到日志打印具体内网地址
conf.set(“hbase.zookeeper.quorum”, zkServer);
try {
conn = ConnectionFactory.createConnection(conf);
admin = conn.getAdmin();
} catch (IOException e) {
e.printStackTrace();
}
}
/**
* 清理所有连接
* @throws IOException
*/
public void clear() throws IOException {
for (Map.Entry<String, Table> m : tables.entrySet()) {
m.getValue().close();
}
admin.close();
conn.close();
conf.clear();
}
/**
* 关卡登记信息bayonet:姓名,身份证号,年龄,性别,关卡号,日期时间,通关形式
* 住宿登记信息hotel:姓名,身份证号,年龄,性别,起始日期,结束日期,同行人
* 网吧登记信息internet:姓名,身份证号,年龄,性别,网吧名,日期,逗留时长
*/
//用于提前建好表和列族
public static void preDeal() throws Exception {
HBaseUtil hBaseUtils = new HBaseUtil();
hBaseUtils.createTable(ConstantUtil.TABLE_NAME, ConstantUtil.COLUMN_FAMILY_1, ConstantUtil.COLUMN_FAMILY_2);
}
//测试
public static void test() throws Exception {
HBaseUtil hBaseUtils = new HBaseUtil();
long startTime = System.currentTimeMillis();
String tb = “testTb”;
String colFamily = “info”;
String col = “name”;
String row = “100000”;
String value = “张三”;
hBaseUtils.createTable(tb, colFamily);
List
Put put = new Put(Bytes.toBytes(row));
put.addColumn(Bytes.toBytes(colFamily), Bytes.toBytes(col), Bytes.toBytes(value));
listPut.add(put);
hBaseUtils.put(tb, listPut);
Result res = hBaseUtils.get(“testTb”, “100000”);
List
for (Cell c : list) {
LOG.info(Bytes.toString(CellUtil.cloneFamily(c)));
LOG.info(Bytes.toString(CellUtil.cloneQualifier(c)));
LOG.info(Bytes.toString(CellUtil.cloneValue(c)));
}
long endTime = System.currentTimeMillis();
float seconds = (endTime - startTime) / 1000F;
LOG.info(“ 耗时” + Float.toString(seconds) + “ seconds.”);
}
public static void main(String[] args) throws Exception {
test();
preDeal();
}
}
运行测试
在主方法里将test方法设为非注释,preDeal方法设为注释

右键HBaseUtil -> Run As -> Java Application,运行测试代码

运行以后控制台输出如下

运行预处理
在Main方法中,将preDeal方法设为非注释,test方法设为注释。

右键HBaseUtil -> Run As -> Java Application,运行预处理(建表和列族)代码。
控制台输出如下信息:

3.2.7.步骤7 编写ElasticSearch工具类
新建类
右键com.huawei.bigdata.utils -> New -> Class -> 新建ElasticSearchUtil类

编辑类
编辑该类的内容
package com.huawei.bigdata.utils;
import com.alibaba.fastjson.JSONObject;
import org.elasticsearch.action.admin.indices.create.CreateIndexResponse;
import org.elasticsearch.action.admin.indices.delete.DeleteIndexResponse;
import org.elasticsearch.action.admin.indices.exists.indices.IndicesExistsResponse;
import org.elasticsearch.action.index.IndexRequestBuilder;
import org.elasticsearch.action.index.IndexResponse;
import org.elasticsearch.action.search.SearchRequestBuilder;
import org.elasticsearch.action.search.SearchResponse;
import org.elasticsearch.client.IndicesAdminClient;
import org.elasticsearch.client.transport.TransportClient;
import org.elasticsearch.common.settings.Settings;
import org.elasticsearch.common.transport.TransportAddress;
import org.elasticsearch.common.xcontent.XContentBuilder;
import org.elasticsearch.common.xcontent.XContentType;
import org.elasticsearch.index.query.QueryBuilder;
import org.elasticsearch.index.query.QueryBuilders;
import org.elasticsearch.search.SearchHit;
import org.elasticsearch.search.SearchHits;
import org.elasticsearch.transport.client.PreBuiltTransportClient;
import org.slf4j.Logger;
import java.io.IOException;
import java.net.InetAddress;
import java.net.UnknownHostException;
import java.util.ArrayList;
import java.util.List;
import java.util.Map;
import java.util.Set;
import static org.elasticsearch.common.xcontent.XContentFactory.jsonBuilder;
/**
* Created by ThisPC on 2020/8/6.
*/
public class ElasticSearchUtil {
//构建Settings对象
private static Settings settings = Settings.builder().put(“cluster.name”, ConstantUtil.CLUSTER_NAME)
.put(“client.transport.sniff”, false).build();
//TransportClient对象,用于连接ES集群
private volatile TransportClient client;
private final static Logger LOG = ConstantUtil.LOG;
public ElasticSearchUtil() {
init();
}
/**
* 同步synchronized(*.class)代码块的作用和synchronized static方法作用一样,
* 对当前对应的*.class进行持锁,static方法和.class一样都是锁的该类本身,同一个监听器
* @return
* @throws UnknownHostException
*/
public TransportClient getClient() {
if (client == null) {
synchronized (TransportClient.class) {
try {
client = new PreBuiltTransportClient(settings)
.addTransportAddress(new TransportAddress(InetAddress.getByName(ConstantUtil.HOSTNAME), ConstantUtil.TCP_PORT));
} catch (UnknownHostException e) {
e.printStackTrace();
}
}
}
return client;
}
/**
* 获取索引管理的IndicesAdminClient
*/
public IndicesAdminClient getAdminClient() {
return getClient().admin().indices();
}
/**
* 判定索引是否存在
* @param indexName
* @return
*/
public boolean isExistsIndex(String indexName) {
IndicesExistsResponse response = getAdminClient().prepareExists(indexName).get();
return response.isExists() ? true : false;
}
/**
* 创建索引
* @param indexName
* @return
*/
public boolean createIndex(String indexName) {
CreateIndexResponse createIndexResponse = getAdminClient()
.prepareCreate(indexName.toLowerCase())
.get();
return createIndexResponse.isAcknowledged() ? true : false;
}
/**
* 删除索引
* @param indexName
* @return
*/
public boolean deleteIndex(String indexName) {
DeleteIndexResponse deleteResponse = getAdminClient()
.prepareDelete(indexName.toLowerCase())
.execute()
.actionGet();
return deleteResponse.isAcknowledged() ? true : false;
}
/**
* 位索引indexName设置mapping
* @param indexName
* @param typeName
* @param mapping
*/
public void setMapping(String indexName, String typeName, String mapping) {
getAdminClient().preparePutMapping(indexName)
.setType(typeName)
.setSource(mapping, XContentType.JSON)
.get();
}
/**
* 创建文档,相当于往表里面insert一行数据
* @param indexName
* @param typeName
* @param id
* @param document
* @return
* @throws IOException
*/
public long addDocument(String indexName, String typeName, String id, Map<String, Object> document) throws IOException {
Set<Map.Entry<String, Object>> documentSet = document.entrySet();
IndexRequestBuilder builder = getClient().prepareIndex(indexName, typeName, id);
XContentBuilder xContentBuilder = jsonBuilder().startObject();
for (Map.Entry e : documentSet) {
xContentBuilder = xContentBuilder.field(e.getKey().toString(), e.getValue());
}
IndexResponse response = builder.setSource(xContentBuilder.endObject()).get();
return response.getVersion();
}
public List<Map<String, Object>> queryStringQuery(String text) {
List<Map<String, Object>> resListMap = null;
QueryBuilder match = QueryBuilders.queryStringQuery(text);
SearchRequestBuilder search = getClient().prepareSearch()
.setQuery(match); //分页 可选
//搜索返回搜索结果
SearchResponse response = search.get();
//命中的文档
SearchHits hits = response.getHits();
//命中总数
Long total = hits.getTotalHits();
SearchHit[] hitAarr = hits.getHits();
//循环查看命中值
resListMap = new ArrayList<Map<String, Object>>();
for (SearchHit hit : hitAarr) {
//文档元数据
String index = hit.getIndex();
//文档的_source的值
Map<String, Object> resultMap = hit.getSourceAsMap();
resListMap.add(resultMap);
}
return resListMap;
}
private void init() {
try {
client = new PreBuiltTransportClient(settings)
.addTransportAddress(new TransportAddress(InetAddress.getByName(ConstantUtil.HOSTNAME), ConstantUtil.TCP_PORT));
} catch (UnknownHostException e) {
e.printStackTrace();
}
}
//用于提前建好索引,相当于关系型数据库当中的数据库
public static void preDealCreatIndex() {
ElasticSearchUtil esUtils = new ElasticSearchUtil();
LOG.info(“start create index…………..”);
esUtils.createIndex(ConstantUtil.INDEX_NAME);
LOG.info(“finished create index !”);
}
/**
* 关卡登记信息bayonet:姓名,身份证号,年龄,性别,关卡号,日期时间,通关形式
* 住宿登记信息hotel:姓名,身份证号,年龄,性别,起始日期,结束日期,同行人
* 网吧登记信息internet:姓名,身份证号,年龄,性别,网吧名,日期,逗留时长
* name,id,age,gender,
* hotelAddr,hotelInTime,hotelOutTime,acquaintancer,
* barAddr,internetDate,timeSpent,
* bayonetAddr,crossDate,tripType
*/
public static void preDealSetMapping() {
JSONObject mappingTypeJson = new JSONObject();
JSONObject propertiesJson = new JSONObject();
JSONObject idJson = new JSONObject();
idJson.put(“type”, “keyword”);
idJson.put(“store”, “true”);
propertiesJson.put(“id”, idJson);
JSONObject nameJson = new JSONObject();
nameJson.put(“type”, “keyword”);
propertiesJson.put(“name”, nameJson);
JSONObject uidJson = new JSONObject();
uidJson.put(“type”, “keyword”);
uidJson.put(“store”, “false”);
propertiesJson.put(“uid”, uidJson);
JSONObject hotelAddr = new JSONObject();
hotelAddr.put(“type”, “text”);
propertiesJson.put(“address”, hotelAddr);
JSONObject happenedDate = new JSONObject();
happenedDate.put(“type”, “date”);
happenedDate.put(“format”, “yyyy-MM-dd”);
propertiesJson.put(“happenedDate”, happenedDate);
JSONObject endDate = new JSONObject();
endDate.put(“type”, “date”);
endDate.put(“format”, “yyyy-MM-dd”);
propertiesJson.put(“endDate”, endDate);
JSONObject acquaintancer = new JSONObject();
acquaintancer.put(“type”, “keyword”);
propertiesJson.put(“acquaintancer”, acquaintancer);
mappingTypeJson.put(“properties”, propertiesJson);
LOG.info(“start set mapping to “ + ConstantUtil.INDEX_NAME + “ “ + ConstantUtil.TYPE_NAME + “ …..”);
LOG.info(mappingTypeJson.toString());
ElasticSearchUtil esUtils = new ElasticSearchUtil();
esUtils.setMapping(ConstantUtil.INDEX_NAME, ConstantUtil.TYPE_NAME, mappingTypeJson.toString());
LOG.info(“set mapping done!!!”);
}
//用于测试
public static void test() {
String index = “esindex”;
System.out.println(“createIndex…………..”);
ElasticSearchUtil esUtils = new ElasticSearchUtil();
esUtils.createIndex(index);
System.out.println(“createIndex done!!!!!!!!!!!”);
System.out.println(“isExists = “ + esUtils.isExistsIndex(index));
System.out.println(“deleteIndex……………”);
esUtils.deleteIndex(index);
System.out.println(“deleteIndex done!!!!”);
}
public static void main(String[] args) throws IOException {
preDealCreatIndex();
preDealSetMapping();
test();
}
}
运行测试
在Main方法中,将test方法设为非注释,其余都注释,右键Run As -> Java Application运行测试代码

运行完成控制台输出如下信息

运行预处理
将test方法设为注释,preDealCreatIndex和preDealSetMapping方法设为非注释。

右键ElasticSearchUtil -> Run As -> Java Application,运行预处理代码。
运行完成后控制台输出如下信息:

3.2.8.步骤8 编写数据导入模块
新建包
右键src/main/java -> New -> Package -> 新建com.huawei.bigdata.insert包

新建类
右键com.huawei.bigdata. insert -> New -> Class -> 新建LoadData2HBaseAndElasticSearch类

编辑该类内容为:
package com.huawei.bigdata.insert;
import com.huawei.bigdata.utils.ConstantUtil;
import com.huawei.bigdata.utils.ElasticSearchUtil;
import com.huawei.bigdata.utils.HBaseUtil;
import org.apache.hadoop.hbase.client.Put;
import org.apache.hadoop.hbase.util.Bytes;
import java.io.BufferedReader;
import java.io.File;
import java.io.FileReader;
import java.util.*;
/**
* Created by ThisPC on 2020/8/6.
*/
/**
* 读取本地文件并解析数据,之后插入HBase、ElasticSearch和graphBase 。
* 对应华为云服务为CloudTable、CSS、GES
*/
public class LoadData2HBaseAndElasticSearch {
private HBaseUtil hBaseUtil;
private ElasticSearchUtil elasticSearchUtil;
public LoadData2HBaseAndElasticSearch() {
}
/**
* 关卡登记信息bayonet:姓名,身份证号,年龄,性别,关卡号,日期时间,通关形式
* 住宿登记信息hotel:姓名,身份证号,年龄,性别,起始日期,结束日期,同行人
* 网吧登记信息internet:姓名,身份证号,年龄,性别,网吧名,日期,逗留时长
* name,uid,age,gender,
* hotelAddr,happenedDate,endDate,acquaintancer,
* barAddr,happenedDate,duration,
* bayonetAddr,happenedDate,tripType
*/
public void insert() throws Exception {
hBaseUtil = new HBaseUtil();
elasticSearchUtil = new ElasticSearchUtil();
String filePath = ConstantUtil.INPUT_PATH;
File dir = new File(filePath);
File[] files = dir.listFiles();
if (files != null) {
for (File file : files) {
if (file.isDirectory()) {
System.out.println(file.getName() + “This is a directory!”);
} else {
//住宿登记信息
if (file.getName().contains(“hotel”)) {
BufferedReader reader = null;
reader = new BufferedReader(new FileReader(filePath + file.getName()));
String tempString = null;
while ((tempString = reader.readLine()) != null) {
//Blank line judgment
if (!tempString.isEmpty()) {
List
String[] elements = tempString.split(“,”);
//生成不重复用户ID,
String id = UUID.randomUUID().toString();
Put put = new Put(Bytes.toBytes(id));
//将数据添加至hbase库
put.addColumn(Bytes.toBytes(“Basic”), Bytes.toBytes(“name”), Bytes.toBytes(elements[0]));
put.addColumn(Bytes.toBytes(“Basic”), Bytes.toBytes(“uid”), Bytes.toBytes(elements[1]));
put.addColumn(Bytes.toBytes(“Basic”), Bytes.toBytes(“age”), Bytes.toBytes(elements[2]));
put.addColumn(Bytes.toBytes(“Basic”), Bytes.toBytes(“gender”), Bytes.toBytes(elements[3]));
put.addColumn(Bytes.toBytes(“OtherInfo”), Bytes.toBytes(“event”), Bytes.toBytes(“hotel”));
put.addColumn(Bytes.toBytes(“OtherInfo”), Bytes.toBytes(“address”), Bytes.toBytes(elements[4]));
put.addColumn(Bytes.toBytes(“OtherInfo”), Bytes.toBytes(“happenedDate”), Bytes.toBytes(elements[5]));
put.addColumn(Bytes.toBytes(“OtherInfo”), Bytes.toBytes(“endDate”), Bytes.toBytes(elements[6]));
put.addColumn(Bytes.toBytes(“OtherInfo”), Bytes.toBytes(“acquaintancer”), Bytes.toBytes(elements[7]));
putList.add(put);
ConstantUtil.LOG.info(“hotel_info start putting to HBase ….:” + id + “ “ + tempString);
hBaseUtil.put(ConstantUtil.TABLE_NAME, putList);
//将数据添加至ES库
Map<String, Object> esMap = new HashMap<String, Object>();
esMap.put(“id”, id);
esMap.put(“name”, elements[0]);
esMap.put(“uid”, elements[1]);
esMap.put(“address”, elements[4]);
esMap.put(“happenedDate”, elements[5]);
esMap.put(“endDate”, elements[6]);
esMap.put(“acquaintancer”, elements[7]);
elasticSearchUtil.addDocument(ConstantUtil.INDEX_NAME, ConstantUtil.TYPE_NAME, id, esMap);
ConstantUtil.LOG.info(“start add document to ES…” + ConstantUtil.INDEX_NAME + “ “ + ConstantUtil.TYPE_NAME + “ “ + id + “ “ + esMap);
}
}
reader.close();
}
//网吧登记信息
else if (file.getName().contains(“internet”)) {
BufferedReader reader = null;
reader = new BufferedReader(new FileReader(filePath + file.getName()));
String tempString = null;
while ((tempString = reader.readLine()) != null) {
//Blank line judgment
if (!tempString.isEmpty()) {
List
String[] elements = tempString.split(“,”);
//生成不重复用户ID,
String id = UUID.randomUUID().toString();
Put put = new Put(Bytes.toBytes(id));
//将数据添加至hbase库
put.addColumn(Bytes.toBytes(“Basic”), Bytes.toBytes(“name”), Bytes.toBytes(elements[0]));
put.addColumn(Bytes.toBytes(“Basic”), Bytes.toBytes(“uid”), Bytes.toBytes(elements[1]));
put.addColumn(Bytes.toBytes(“Basic”), Bytes.toBytes(“age”), Bytes.toBytes(elements[2]));
put.addColumn(Bytes.toBytes(“Basic”), Bytes.toBytes(“gender”), Bytes.toBytes(elements[3]));
put.addColumn(Bytes.toBytes(“OtherInfo”), Bytes.toBytes(“event”), Bytes.toBytes(“internetBar”));
put.addColumn(Bytes.toBytes(“OtherInfo”), Bytes.toBytes(“address”), Bytes.toBytes(elements[4]));
put.addColumn(Bytes.toBytes(“OtherInfo”), Bytes.toBytes(“happenedDate”), Bytes.toBytes(elements[5]));
put.addColumn(Bytes.toBytes(“OtherInfo”), Bytes.toBytes(“duration”), Bytes.toBytes(elements[6]));
putList.add(put);
ConstantUtil.LOG.info(“internet_info start putting to HBase … :” + id + “ “ + tempString);
hBaseUtil.put(ConstantUtil.TABLE_NAME, putList);
//将数据添加至ES库
Map<String, Object> esMap = new HashMap<String, Object>();
esMap.put(“id”, id);
esMap.put(“name”, elements[0]);
esMap.put(“uid”, elements[1]);
esMap.put(“address”, elements[4]);
esMap.put(“happenedDate”, elements[5]);
elasticSearchUtil.addDocument(ConstantUtil.INDEX_NAME, ConstantUtil.TYPE_NAME, id, esMap);
ConstantUtil.LOG.info(“start add document to ES…” + ConstantUtil.INDEX_NAME + “ “ + ConstantUtil.TYPE_NAME + “ “ + id + “ “ + esMap);
}
}
reader.close();
}
//关卡登记信息
else if (file.getName().contains(“bayonet”)) {
BufferedReader reader = null;
reader = new BufferedReader(new FileReader(filePath + file.getName()));
String tempString = null;
while ((tempString = reader.readLine()) != null) {
//Blank line judgment
if (!tempString.isEmpty()) {
List
String[] elements = tempString.split(“,”);
//生成不重复用户ID,
String id = UUID.randomUUID().toString();
Put put = new Put(Bytes.toBytes(id));
//将数据添加至hbase库
put.addColumn(Bytes.toBytes(“Basic”), Bytes.toBytes(“name”), Bytes.toBytes(elements[0]));
put.addColumn(Bytes.toBytes(“Basic”), Bytes.toBytes(“uid”), Bytes.toBytes(elements[1]));
put.addColumn(Bytes.toBytes(“Basic”), Bytes.toBytes(“age”), Bytes.toBytes(elements[2]));
put.addColumn(Bytes.toBytes(“Basic”), Bytes.toBytes(“gender”), Bytes.toBytes(elements[3]));
put.addColumn(Bytes.toBytes(“OtherInfo”), Bytes.toBytes(“event”), Bytes.toBytes(“bayonet”));
put.addColumn(Bytes.toBytes(“OtherInfo”), Bytes.toBytes(“address”), Bytes.toBytes(elements[4]));
put.addColumn(Bytes.toBytes(“OtherInfo”), Bytes.toBytes(“happenedDate”), Bytes.toBytes(elements[5]));
put.addColumn(Bytes.toBytes(“OtherInfo”), Bytes.toBytes(“tripType”), Bytes.toBytes(elements[6]));
putList.add(put);
hBaseUtil.put(ConstantUtil.TABLE_NAME, putList);
ConstantUtil.LOG.info(“bayonet_info start putting to HBase….:” + id + “ “ + tempString);
//将数据添加至ES库
Map<String, Object> esMap = new HashMap<String, Object>();
esMap.put(“id”, id);
esMap.put(“name”, elements[0]);
esMap.put(“uid”, elements[1]);
esMap.put(“address”, elements[4]);
esMap.put(“happenedDate”, elements[5]);
elasticSearchUtil.addDocument(ConstantUtil.INDEX_NAME, ConstantUtil.TYPE_NAME, id, esMap);
ConstantUtil.LOG.info(“start add document to ES…” + ConstantUtil.INDEX_NAME + “ “ + ConstantUtil.TYPE_NAME + “ “ + id + “ “ + esMap);
}
}
reader.close();
}
//数据描述文件跳过
else {
continue;
}
}
}
ConstantUtil.LOG.info(“load and insert done !!!!!!!!!!!!!!!!!!”);
}
}
public static void start() throws Exception {
LoadData2HBaseAndElasticSearch load2DB = new LoadData2HBaseAndElasticSearch();
load2DB.insert();
}
public static void main(String[] args) throws Exception {
start();
}
}
运行导入
运行主方法开始导入

右键LoadData2HbaseAndElasticSearch -> Run As -> Java Application。
运行后需要一段时间数据才能执行完毕,运行完毕后可以看到

3.2.9.步骤9 编写ElasticSearch工具类
新建包
右键src/main/java -> New -> Package -> 新建com.huawei.bigdata.query包

新建类
右键com.huawei.bigdata.query -> New -> Class -> 新建Query类

编辑类内容为:
package com.huawei.bigdata.query;
import com.alibaba.fastjson.JSONObject;
import com.huawei.bigdata.utils.ConstantUtil;
import com.huawei.bigdata.utils.ElasticSearchUtil;
import com.huawei.bigdata.utils.HBaseUtil;
import org.apache.hadoop.hbase.Cell;
import org.apache.hadoop.hbase.CellUtil;
import org.apache.hadoop.hbase.client.Result;
import org.apache.hadoop.hbase.util.Bytes;
import java.io.IOException;
import java.util.List;
import java.util.Map;
/**
* Created by ThisPC on 2020/8/6.
* 搜索逻辑是先搜索ElasticSearch,再查HBase
*/
public class Query {
private HBaseUtil hBaseUtil = new HBaseUtil();
private ElasticSearchUtil elasticSearchUtil = new ElasticSearchUtil();
private JSONObject result = new JSONObject();
private JSONObject tmpJS = new JSONObject();
public String query(String target) {
result.clear();
tmpJS.clear();
long startTime = System.currentTimeMillis();
List<Map<String, Object>> listMap = elasticSearchUtil.queryStringQuery(target);
long endTime = System.currentTimeMillis();
float seconds = (endTime - startTime) / 1000F;
ConstantUtil.LOG.info(“ElasticSearch查询耗时” + Float.toString(seconds) + “ seconds.”);
for (Map<String, Object> m : listMap) {
String id = m.get(“id”).toString();
JSONObject tmpJS = new JSONObject();
tmpJS.put(“id”, id);
Result res = null;
try {
long s1 = System.currentTimeMillis();
res = hBaseUtil.get(ConstantUtil.TABLE_NAME, id);
long e1 = System.currentTimeMillis();
float se1 = (e1 - s1) / 1000F;
ConstantUtil.LOG.info(“HBase查询耗时” + Float.toString(se1) + “ seconds.”);
Cell[] cells = res.rawCells();
for (Cell cell : cells) {
String col = Bytes.toString(CellUtil.cloneQualifier(cell));
System.out.println(col);
String value = Bytes.toString(CellUtil.cloneValue(cell));
System.out.println(value);
tmpJS.put(col, value);
}
result.put(id, tmpJS);
} catch (IOException e) {
e.printStackTrace();
result.put(id, “查询失败!”);
}
}
return result.toString();
}
public static void main(String[] args) throws Exception {
Query query = new Query();
long startTime = System.currentTimeMillis();
System.out.println(query.query(“100004”));
long endTime = System.currentTimeMillis();
float seconds = (endTime - startTime) / 1000F;
ConstantUtil.LOG.info(“ 耗时” + Float.toString(seconds) + “ seconds.”);
}
}
运行测试
运行查询测试代码

右键Query -> Run As -> Java Application,运行测试代码。
运行后控制台输出如下

3.2.10.步骤10编写页面模块
导入插件
在src/main/resources下新建文件夹名为static
右键src/main/resources -> New -> Other -> General -> Folder -> 新建static文件夹.

在static下新建文件夹名为plugins
右键static -> New -> Folder -> 新建plugins文件夹.

将两个插件复制进static.plugins文件夹下

导入HTML页面
src/main/resources下新建文件夹名为templates
右键src/main/resources -> New -> Folder -> 新建templates文件夹.

在templates文件夹下导入(复制)info_target_search.html文件

info_target_search.html的内容如下:
1 |
|
3.2.11.步骤11部署搜索服务
新建manager包
在com.huawei.bigdata包下新建manager包
右键src/main/java -> New -> Package -> 新建com.huawei.bigdata.manager包

在manager包新建Manager类
右键com.huawei.bigdata.manager-> New -> Class -> 新建Manager类

编辑Manager类内容:
package com.huawei.bigdata.manager;
import com.huawei.bigdata.query.Query;
import org.springframework.stereotype.Component;
@Component
public class Manager {
private static Query query = new Query();
public static String getQueryResult(String target) {
try {
String result = query.query(target);
System.out.println(result);
return result;
} catch (Exception e) {
e.printStackTrace();
return “查询出现异常,请通知研发人员!”;
}
}
public static void main(String[] args) {
String target = “牧之桃”;
String result = Manager.getQueryResult(target);
System.out.println(result);
}
}
右键Manager-> Run As -> Java Application,运行测试。
运行控制台输出如下

新建controller包
在com.huawei.bigdata包下新建controller包
右键src/main/java -> New -> Package -> 新建com.huawei.bigdata.controller包

在com.huawei.bigdata包下新建SearchController类
右键com.huawei.bigdata.bigdata -> New -> Class -> 新建SearchController类
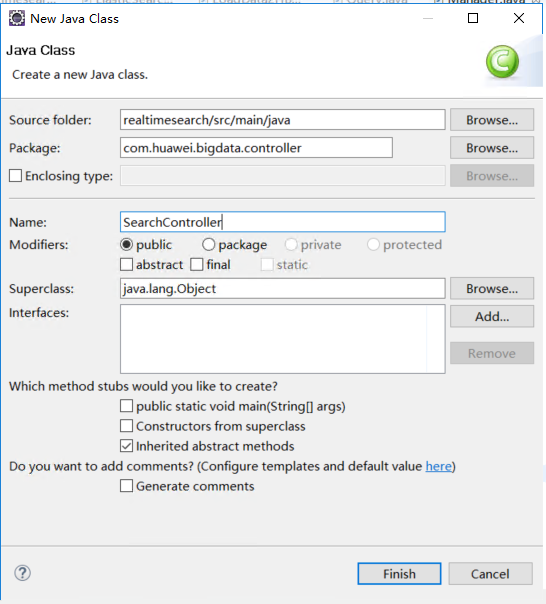
编辑SearchController类内容如下:
package com.huawei.bigdata.controller;
import org.springframework.boot.SpringApplication;
import org.springframework.stereotype.Controller;
import org.springframework.ui.ModelMap;
import org.springframework.web.bind.annotation.RequestMapping;
/**
* Created by ThisPC on 2020/8/6.
*
* 注解声明,该类为Controller类 并自动加载所需要的其它类
*/
@Controller
public class SearchController {
@RequestMapping(“/search_target”)
String testdo(ModelMap map) {
//这里返回HTML页面
return “info_target_search”;
}
// 主方法,像一般的Java类一般去右击run as application时候,执行该方法
public static void main(String[] args) {
SpringApplication.run(SearchController.class, args);
}
}
新建rest包
在controller包下新建rest包
右键com.huawei.bigdata.controller-> New -> Package -> 新建rest包

在rest包下新建SearchService类
右键com.huawei.bigdata.controller.rest -> New -> Class -> 新建SearchService类

编辑SearchService类内容
package com.huawei.bigdata.controller.rest;
import com.huawei.bigdata.manager.Manager;
import org.springframework.boot.SpringApplication;
import org.springframework.boot.autoconfigure.EnableAutoConfiguration;
import org.springframework.context.annotation.ComponentScan;
import org.springframework.web.bind.annotation.RequestMapping;
import org.springframework.web.bind.annotation.RestController;
/**
* Created by ThisPC on 2020/8/6.
*/
@RestController
@EnableAutoConfiguration
@ComponentScan(basePackages = {“com.huawei.bigdata”})
public class SearchService {
@RequestMapping(“/search”)
public String search(String target) {
try {
return Manager.getQueryResult(target);
} catch (Exception e) {
e.printStackTrace();
}
return “不小心出错了!”;
}
// 主方法,像一般的Java类一般去右击run as application时候,执行该方法
public static void main(String[] args) throws Exception {
SpringApplication.run(SearchService.class, args);
}
}
新建boot包
在controller包下新建boot包
右键com.huawei.bigdata.controller-> New -> Package -> 新建boot包
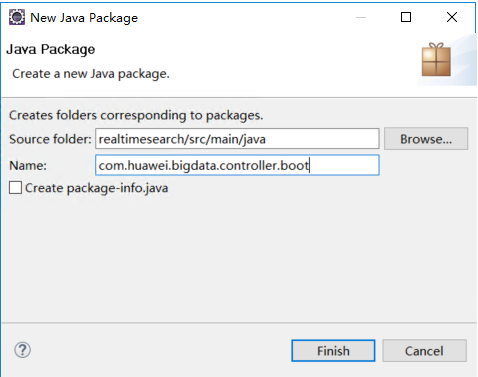
在boot包下新建ApplicationBootController类
右键com.huawei.bigdata.controller.boot -> New -> Class -> 新建ApplicationBootController类

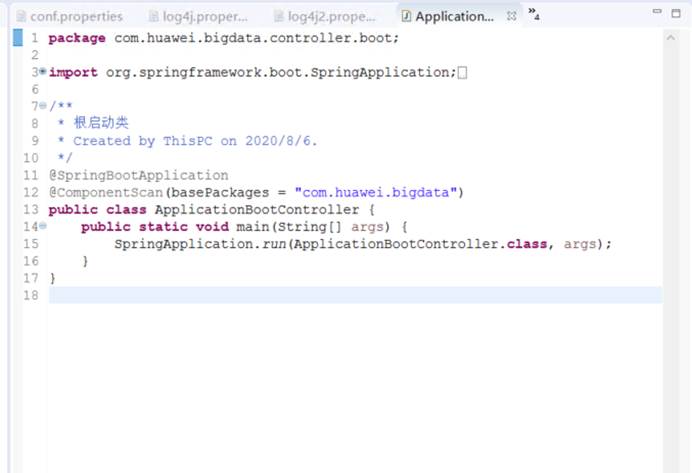
编辑ApplicationBootController类内容:
package com.huawei.bigdata.controller.boot;
import org.springframework.boot.SpringApplication;
import org.springframework.boot.autoconfigure.SpringBootApplication;
import org.springframework.context.annotation.ComponentScan;
/**
* 根启动类
* Created by ThisPC on 2020/8/6.
*/
@SpringBootApplication
@ComponentScan(basePackages = “com.huawei.bigdata”)
public class ApplicationBootController {
public static void main(String[] args) {
SpringApplication.run(ApplicationBootController.class, args);
}
}
此时项目完整结构为:

3.2.12.步骤12效果演示
启动服务
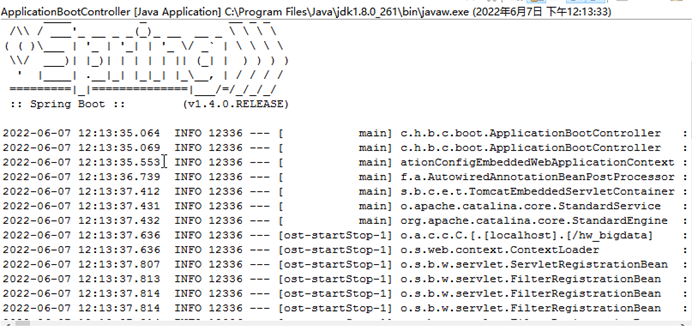
右键ApplicationBootController-> Run As -> Java Application,运行ApplicationBootController
启动成功后控制台输出如下:
在浏览器查看Web页面
打开ECS服务器的chrome浏览器,输入http://localhost:8084/hw_bigdata/search_target
搜索演示
ID查询
输入100006

输入100007

姓名查询
输入孙寻真

输入陈友儿

地址查询
输入汉庭

输入心悦

输入时间2017-09-03
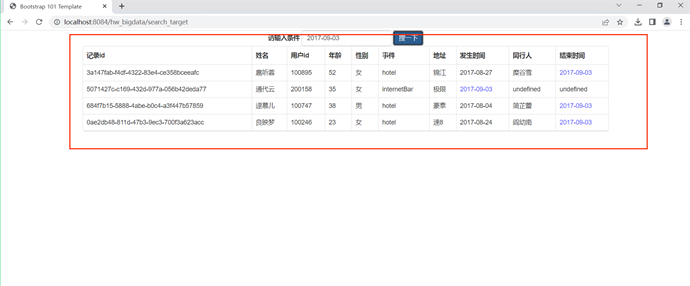
实验完成。
3.2.13.步骤13释放资源
删除云搜索服务
进入云搜索服务管理页面删除云搜索服务CSS

删除MapReduce服务
进入MapReduce服务控制台页面删除MapReduce服务MRS
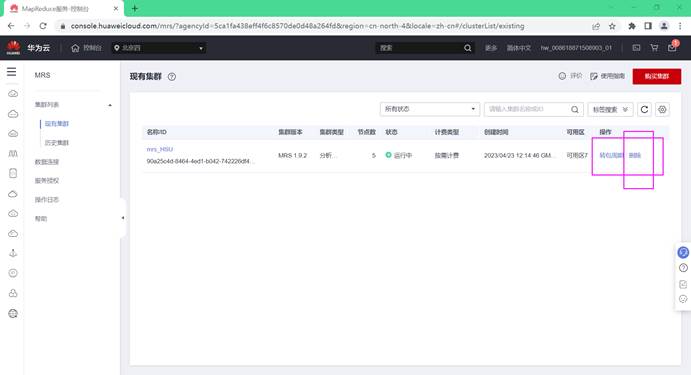
删除弹性云服务器
进入弹性云服务管理页面,删除弹性云服务服务器ECS和弹性公网IP


4.实验总结
(1)实验完成情况
实验完成率:100%。
(2)出现的问题与解决方案
问题1:ElasticSearch工具类的DeleteIndexResponse类无法正常导入
org.elasticsearch.action.admin.indices.delete.DeleteIndexResponse包。
解决方法:ElasticSearch7.x版本更新所致。只要删除对应导入、将代码修改为直接返回结果。
问题2:运行ElasticSearch.java失败,没能成功。
解决方法:实验手册中给出的pom.xml是6.x版本,我的CSS使用的集群版本为7.10.2,这就造成了不匹配。因此,将pom.xml中Elasticsearch的版本信息都改为7.10.2即可,再次运行就会成功运行。

问题3:远程桌面连接弹性云服务器时出现错误

解决方法:切换校园网为手机热点即可。
5.课程总结
短短两个月的大数据技术原理与应用课程和对应的实验课程让我提升了很多。张老师大力发动学生们的积极性,让我们自己在QQ群里面自主提问,自主解答,营造了良好的互帮互助的学习氛围。我是第一次见到原来可以这样学习,通过课程群的积极交流和讨论,不知不觉就解决了自己的问题。同时允许提前完成实验的同学当助教,教学相长也。当过助教的同学也对实验可能出现的问题有了更广更深的理解。
在张天成老师循循善诱又充满幽默和笑声的课堂上,我对分布式有了初步理解。可以讲Hadoop的核心内容看作是两个部分,一个是分布式存储,一个是分布式计算。
对于分布式存储,Hadoop有自己的一套系统来处理叫Hadoop distribution file system。为什么分布式存储需要一个额外的系统来处理呢,而不是就把1TB以上的文件分开存放就好了呢。如果不采用新的系统,我们存放的东西没办进行一个统一的管理。存放在A电脑的东西只能在连接到A去找,存在B的又得单独去B找。繁琐且不便于管理。而这个分布式存储文件系统能把这些文件分开存储的过程透明化,用户看不到文件是怎么存储在不同电脑上,看到的只是一个统一的管理界面。现在的云盘就是很好的给用户这种体验。
对于分布式计算。在对海量数据进行处理的时候,一台机器肯定也是不够用的。所以也需要考虑将将数据分在不同的机器上并行的进行计算,这样不经可以节省大量的硬件的I/O开销。也能够将加快计算的速度。Hadoop对分布式计算的系统为MapReduce。Map即将数据分开存放进行计算,Reduce将分布计算的得到的结果进行整合,最后汇总得到一个最终的结果。这样对Hadoop的技术有一个清晰框架思路。
张老师的引导让我对分布式系统架构Hadoop有了较为扎实的理论基础,我与同学多次花费大量课外时间自学java,最终掌握了JAVA这门语言,它具有良好的可移植性和跨平台性,与C++一样都是面对对象的。学习Java的过程中,我对类、接口、包有了自己的理解。凭借着C和C++的基础,我们借助java实践切身感受了Hadoop的强大功能。不仅如此,我们通过大数据技术原理与应用的实验1、实验2、实验3、实验4、实验5分别了解并照着实验手册实践感受了Hbase、Redis、MongoDB以及NoSQL数据库、MapReduce的使用。
张天成老师给我们布置了更加具有挑战性和实践意义的华为云实验来代替大数据技术原理与应用的实验6和实验7。同时充分考虑了班级同学的需求和经济水平,给我们每位同学申请了代金券,这才让每位同学都能够获得这个来之不易的实验机会。虽然没有在课堂上学到Flink和Spark,我课余时间自己进行了摸索。
感谢张老师的悉心教导和助教学长们的热情帮助,两个月的时间收获颇丰,也给了我的未来一种新的可能性。总而言之,选了大数据方向我很庆幸。我真心感激自己有机会上这门课程,我原本对未来的方向没有确定,但学习这门课程之后,我深深地爱上了大数据这一领域,并且想要继续探索。我对分布式数据库还有想了解的东西,对并行处理还想深入学习。作为知行合一的东大人,站在东大百年校庆的风口上,虽然这门课的学习告一段落,但是大数据的学习远远没有终点。